IDS / IPS Firewall Detection Techniques
- Sending Bad Checksums
- TCP ACK Scan (-sA)
Sending Bad Checksums
nmap --badsum <target IP> (–badsum is used to send the packets with bad or bogus TCP/UDP checksums to the intended target to avoid certain firewall rulesets)
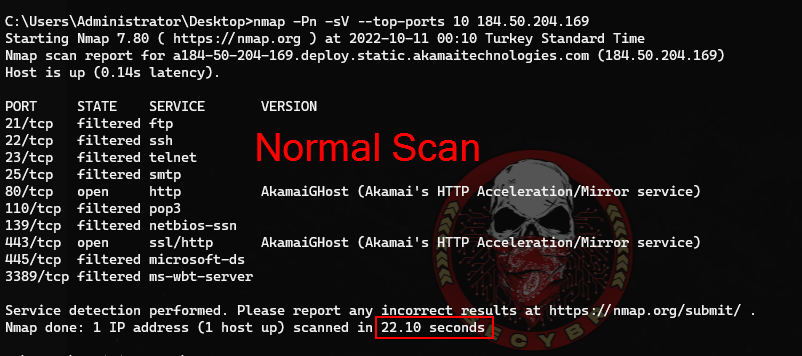
The scan result shows all ports are filtered, indicating that there is no response or the packets are dropped, and thus it can be inferred that the system is configured.
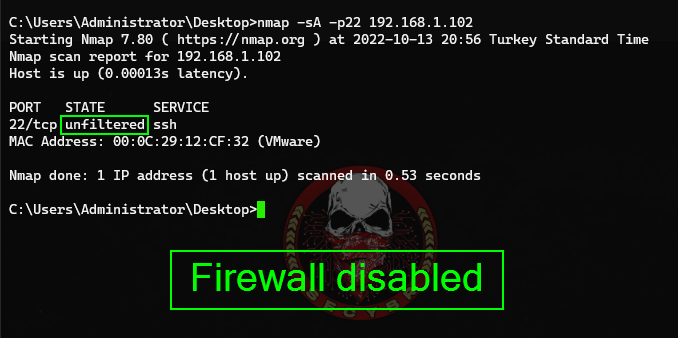
TCP ACK Scan (-sA)
It is always good to send ACK packets instead of SYN packets because if there is any active firewall running on the remote computer it cannot generate firewall logs due to ACK packets because firewalls treat ACK packet as SYN’s response. package. TCP ACK scan, requires root privileges on the attacker side and performs very well for stateless firewall and IDS. As a penetration tester, you need to check the response of a firewall; There can be four types of responses:
- Open port (several ports in case of firewall)
- Closed port (most ports are closed due to firewall)
- Filtered (not sure if Nmap port is open)
- Unfiltered (Nmap can access port but still confused about port open status)
So these are some important answers you can get during a penetration test. ACK scanning is slightly different from other scanning techniques because it is not designed to discover open ports, but has the ability to identify filtered and unfiltered responses. Let’s compare the two results of an ACK scan.
If you need more details, you can check this guide from here.
1
nmap -sA 192.168.x.x


Evasion Techniques
- Decoys
- Proxies
- User Agents
- MAC Address Spoofing
- Host Detection Methods (Ping Suppression)
- Fragmentation
- Timing
- Changing Data length
- Random Scan
- Using Multiple Techniques
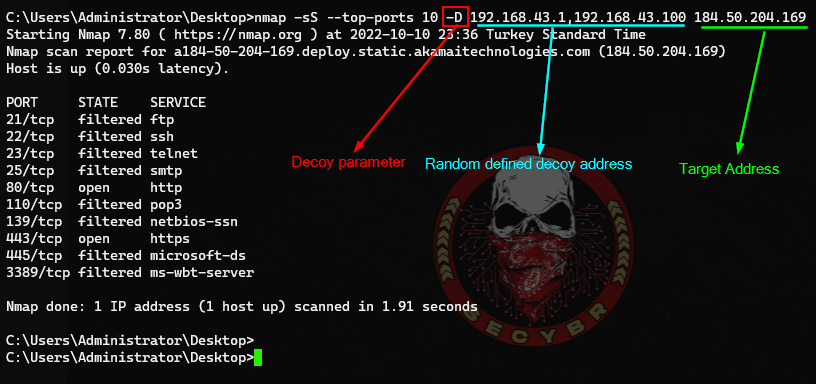
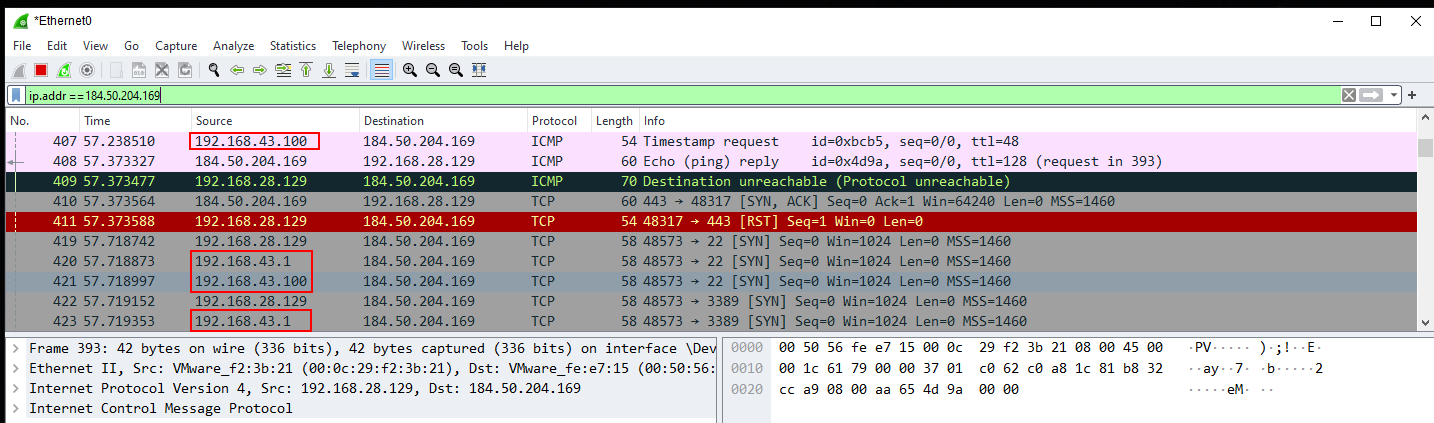
Decoys
It is strictly not an evasion technique, but is used to hide the source of the scan. we still need to send packets from our IP address, but we can spoof other IP addresses during the scan so we can make the scan look like it’s coming from other hosts.
In this way, it can make it difficult for the security device to automatically block our IP and determine our IP.
1
2
3
4
5
nmap -D RND:10 192.168.x.x #(Generates a random number of decoys)
nmap -sS --top-ports 10 -D 192.168.xx.xx,192.168.yy.yy,10.10.xx.xx 8.8.8.8 #(Manually specify the IP addresses of the decoys)
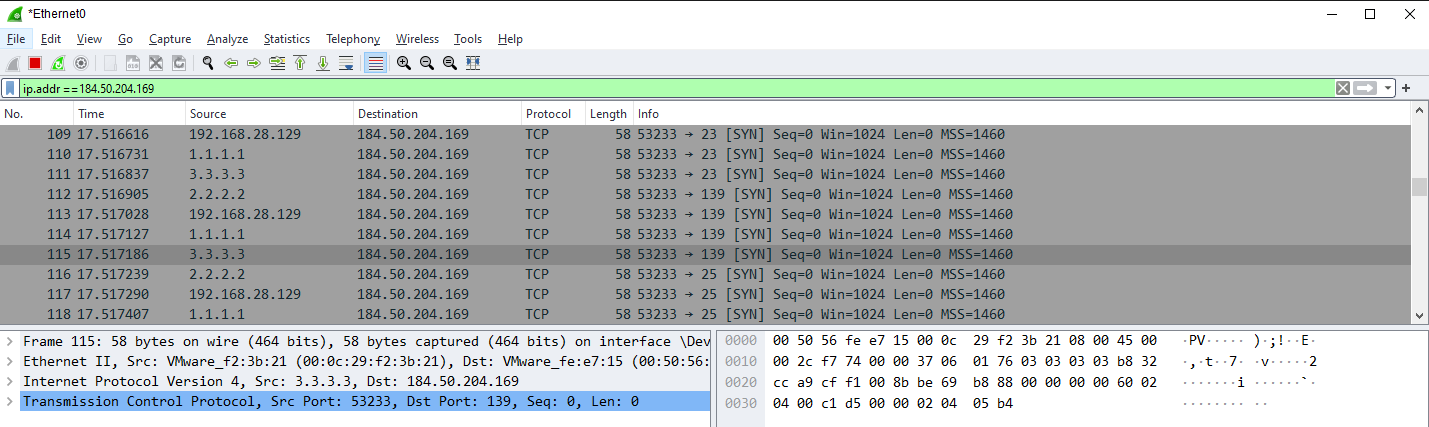
# Tip: If your target at the external network, you have to use external IP address. You can use many random different IP address. Just remember to use "," between two IP addresses.
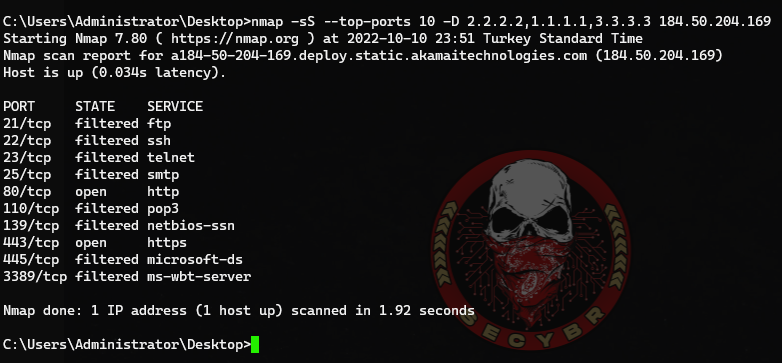
# For example usage
nmap -sS --top-ports 10 -D 2.2.2.2,1.1.1.1 184.50.204.169
Proxies
Nmap scanning with Tor
1
2
3
4
5
6
sudo apt-get install tor

#Configuration tor
sudo apt-get install ntpdate #Proxies need exact time settings from your system. Check your timezone, choose the one that is correct for your region.
sudo ntpdate -v pool.ntp.org # After it's finished, reboot and you are good to go
sudo apt-get install proxychains
ProxyChains is already configured to use Tor by default. You can verify this by looking up /etc/proxychains.conf. The last lines should be like these:
1
2
3
4
5
[ProxyList]
# add proxy here ...
# meanwile
# defaults set to "tor"
socks4 127.0.0.1 9050
There are two proxychains.conf files in kali linux. For more effective results, after backing up the proxychains.conf file, update the proxychains4.conf file as proxychains.conf.
1
2
sudo cp /etc/proxychains.conf /etc/proxychains.conf.bck
sudo cp /etc/proxychains4.conf /etc/proxychains.conf
We are now ready to perform an anonymous Nmap scan over the Tor network.
1
sudo proxychains nmap -Pn -sV -p80 116.62.x.x #If you don't get results the first time, you may have to try a few more times.
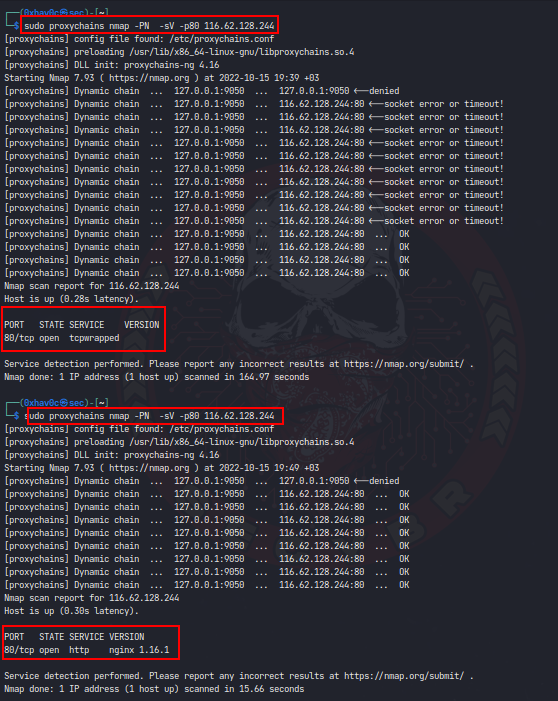
Nmap Through Tor: Get Round Blocked Endpoints
It is possible that we will encounter a situation where scan fails, because Tor endpoints are blocked.The solution may be in adding common public proxy server to the ‘chain’. We can do that by simply editing the /etc/proxychains.conf and adding a new entry at the end of the [ProxyList] (be sure that random_chain option is disabled).
1
2
3
4
5
6
[ProxyList]
# add proxy here ...
# meanwile
# defaults set to "tor"
socks4  127.0.0.1 9050
socks4 121.34.113.5 1080
User Agents
By default Nmap comes fully bundled with NSE (Nmap Scripting-Engine) a fully integrated scripting engine with many useful libraries.
The http library is very commonly used, however many people dont realise they are using the user-agent Mozilla/5.0 (compatible; Nmap Scripting Engine; http://nmap.org/book/nse.html)
This is obviously a value you wouldn’t like to be used when pen-testing, as it would give your presence away on the battlefield, as they say. Additionally, it is easily detected and blocked (Unique to Nmap’s NSE http library).
If you are going to use an http script in your nmap scan, for example http enum or full port scan, don’t forget to change the user agent.
Furthermore, Mod Security, and many other WAF’s (Web Application Firewalls) etc will quickly catch on to what you’re up to. For example a ModSecurity rule that detects and blocks this default user agent is:
1
SecRule REQUEST_HEADERS:User-Agent "@streq Mozilla/5.0 (compatible; Nmap Scripting Engine; http://nmap.org/book/nse.html)" deny
With a good Sec setup on the server using ModSecurity, fail2ban etc would more than likely kick in, dropping your scanner’s connections.
According to the NMAP development team this value is left by “design” and that if you want to change it you have to use --script-args http.useragent="some ua" when launching your Nmap scans. There are some packet filtering products that block requests using Nmap’s default HTTP user agent. You can use a different user agent value by setting the argument http.useragent:
1
nmap -p80 --script http-sqli-finder --script-args http.useragent="Mozilla 42" 192.168.x.x
To set the user agent in your NSE script, you can pass the header field, as follows:
1
options = {header={}}    options['header']['User-Agent'] = "Mozilla/9.1 (compatible; Windows       NT 5.0 build 1420;)"    local req = http.get(host, port, uri, options)
The problem is that this is burdensome to add (and remember) everytime you need it.
NMAP How to change user agent
You can find the default value in /usr/share/nmap/nselib/http.lua (At the beginning of the file, a couple of lines after the comments)
1
local USER_AGENT = stdnse.get_script_args('http.useragent') or "Mozilla/5.0 (compatible; Nmap Scripting Engine; http://nmap.org/book/nse.html)"
You can change the value with this line
1
local USER_AGENT = stdnse.get_script_args('http.useragent') or "Mozilla/5.0 (compatible; MSIE 9.0; Windows NT 6.1; WOW64; Trident/5.0)"
You can set it to whatever you like, stealth is key, change it periodically etc.
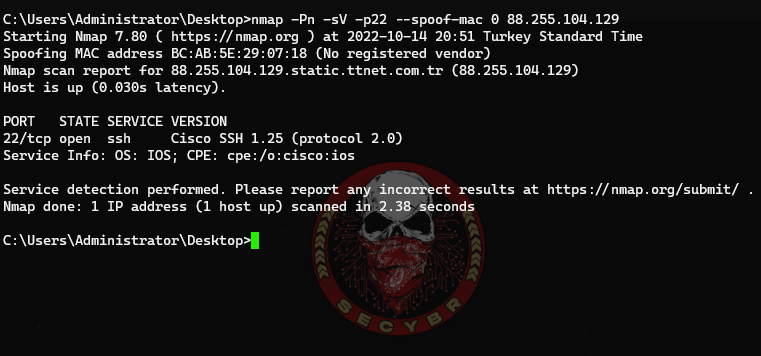
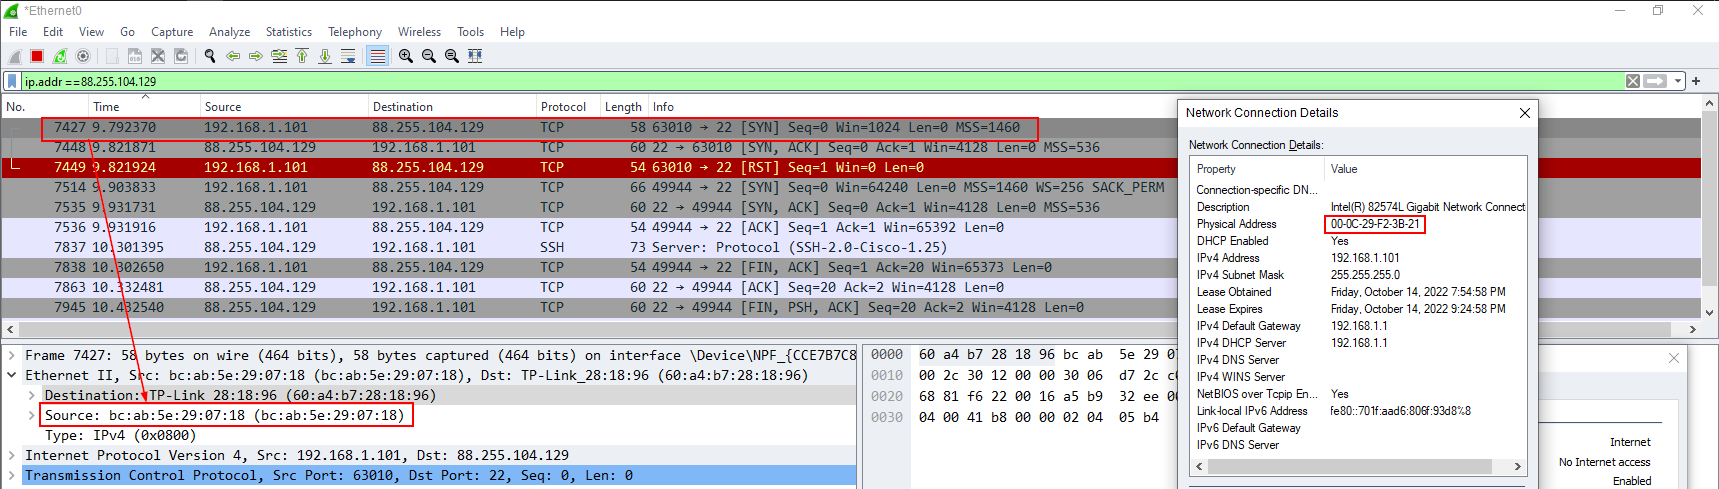
MAC Address Spoofing
Another method for bypassing firewall restrictions while doing a port scan is by spoofing the MAC address of your host.This technique can be very effective especially if there is a MAC filtering rule to allow only traffic from certain MAC addresses so you will need to discover which MAC address you need to set in order to obtain results.
Specifically the –spoof-mac option gives you the ability to choose a MAC address from a specific vendor,to choose a random MAC address or to set a specific MAC address of your choice.Another advantage of MAC address spoofing is that you make your scan more stealthier because your real MAC address it will not appear on the firewall log files.
1
2
3
nmap -Pn -sV --spoof-mac 0 192.168.x.x #Generate a random MAC address —-> —spoof-mac 0
nmap -Pn -sV --spoof-mac Dell 192.168.x.x #Specify MAC address from a Vendor —-> –spoof-mac Dell/Apple/3Com
nmap -Pn -sV --spoof-mac 00:0C:29:6F:D9:6A 192.168.x.x #Specify your own MAC address —-> —spoof-mac 00:0C:29:6F:D9:6A (For example NAC, IT Personal MAC Address)
Host Detection Methods - Ping Suppression
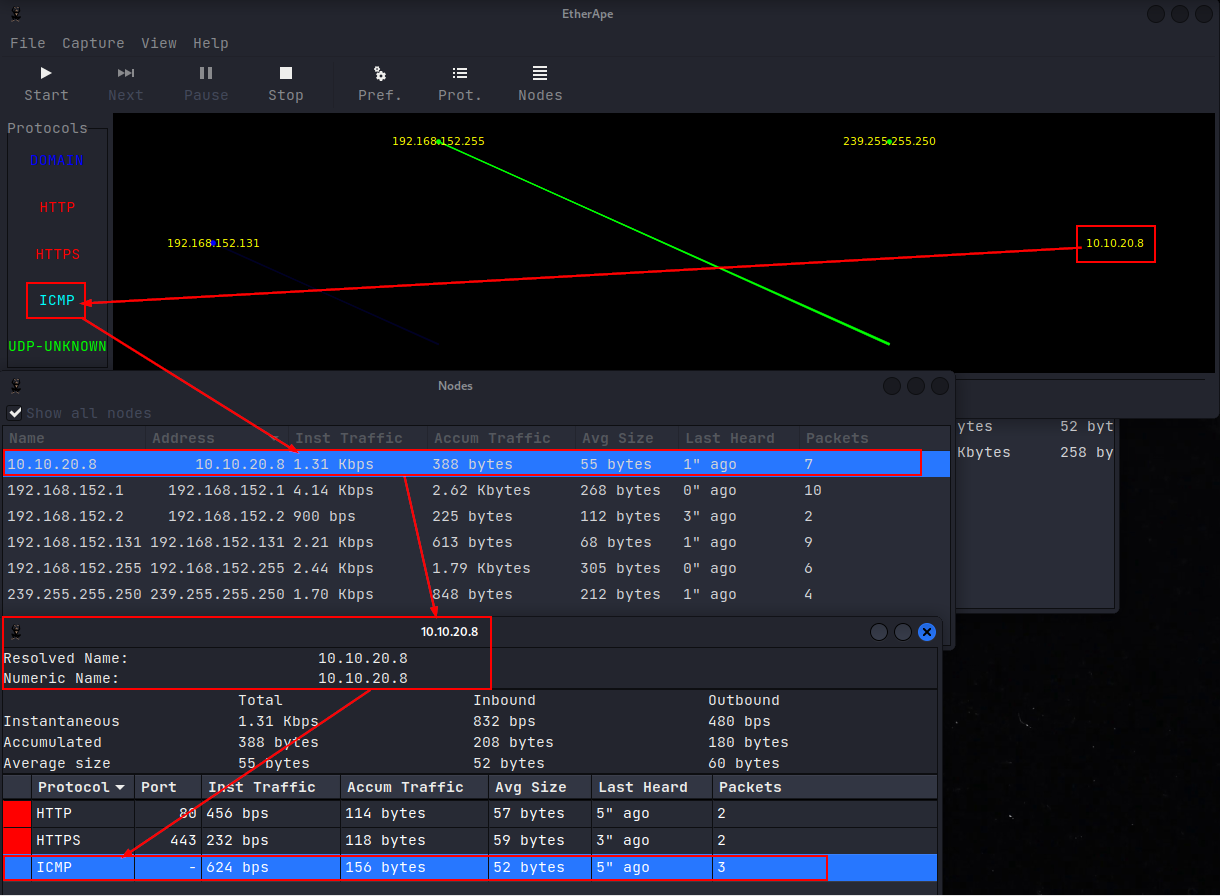
Typically, security administrators block ICMP (echo request, echo response) ping on the firewall to prevent outside attackers from discovering active hosts.
When we Scan with Nmap it sends an ICMP Request to see if the host is available and open. If no response, informs that the host is not working. Using the -Pn switch we can scan our target without sending the default ICMP.
1
2
3
4
5
nmap -Pn 192.168.x.x #No ping scan
sudo nmap -sn -PA 192.168.x.x #ACK Ping scan
sudo nmap -sn -PU 192.168.x.x #UDP Ping scan
sudo nmap -sn -PS 192.168.x.x #TCP SYN Ping
sudo nmap -sn -PR 192.168.x.x #ARP Ping
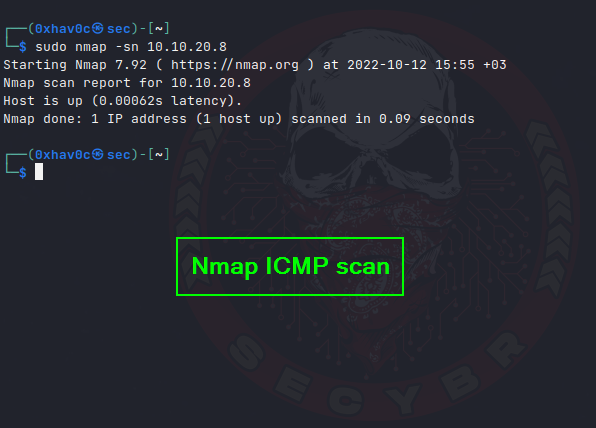 nmap ICMP scan -1
 nmap ICMP scan -2
 nmap ICMP scan -3
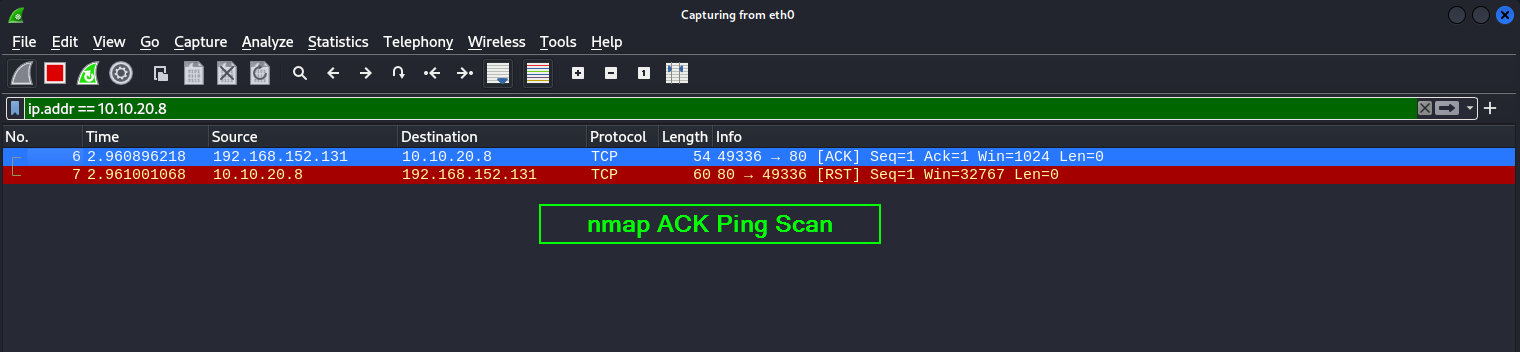 nmap ACK ping scan
Fragmentation
Fragment Packets
This is a very general concept and can be used in many different situations, for example: the fragmentation technique is useful for escaping the firewall if the target machine does not have the capabilities to handle larger packets. The parameter for this technique is -f, it simply splits the request into segments of small IP packets called fragmented IP packets. You can use -f twice -ff if you want to break IP headers further.
In this attack, nmap will split the IP header into many small pieces to escape the IDS. The pieces are then reassembled at the destination. Because IDS relies on signatures very similar to AV software, parts will not match the signature IDS is looking for. This, will allow the fragments to traverse the network where they will be reassembled on the target machine and do a port scan.
1
2
nmap -sT -f 192.168.x.x
nmap -sV -ff 192.168.x.x #if you want to break IP headers further.
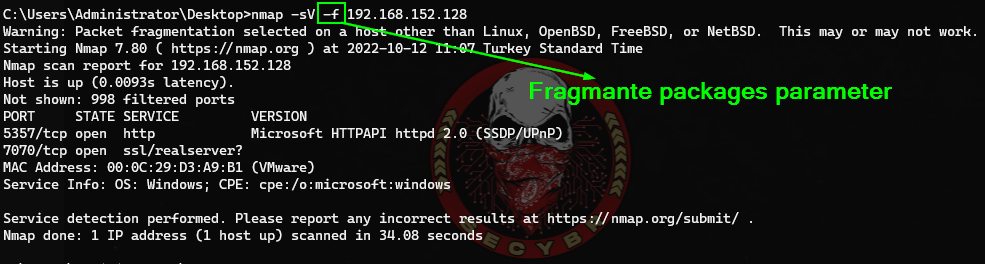 Fragment Packets - Nmap
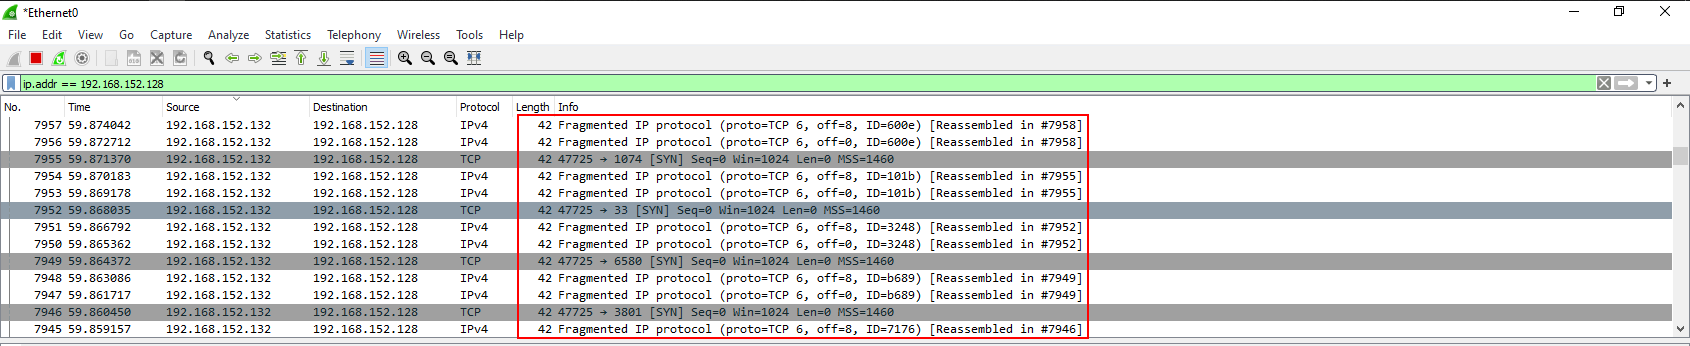 Capture a fragment packet
Specify a specific MTU
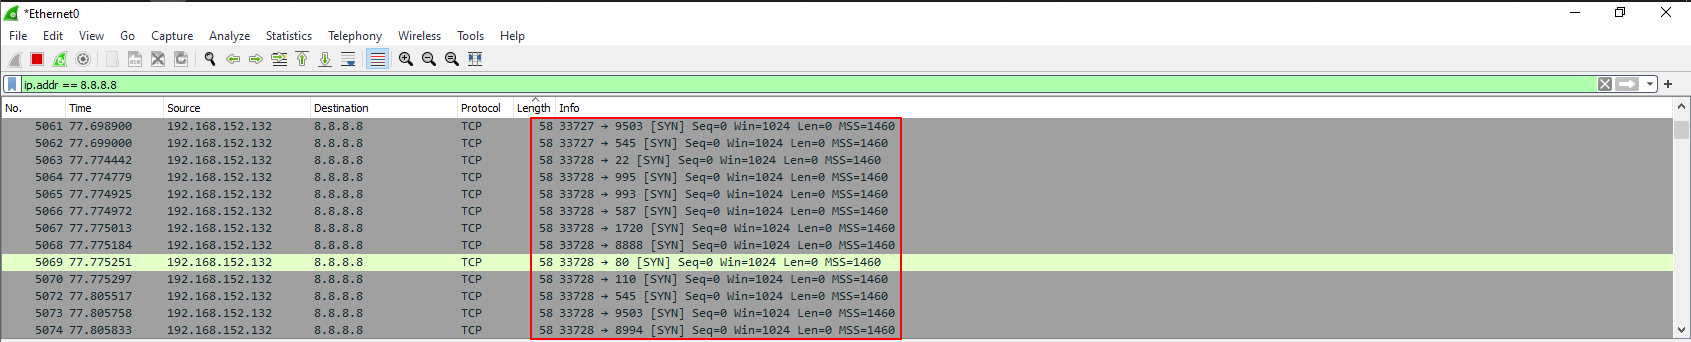
Nmap is giving the option to the user to set a specific MTU (Maximum Transmission Unit) to the packet. This is similar to the packet fragmentation technique that we have explained above. During the scan that size of the nmap will create packets with size based on the number that we will give. In this example we gave the number 32 so the nmap will create 32-byte packets causing a confusion to the firewall. Have in mind that the MTU number must be a multiple of 8 (8,16,24,32 etc). You can specify the MTU of your choice with the command –mtu number target.
1
nmap -sV --mtu 32 192.168.x.x
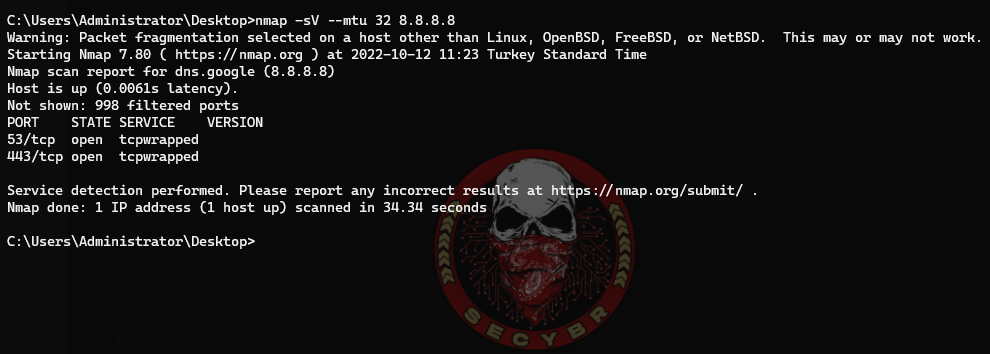 Specify a specific MTU to the packets
Timing
The scheduling option is a very important and interesting feature of an Nmap because sometimes you have to make a delay between each request. There are many reasons for this, but the most important reason is the stress on the network; sometimes the victim’s computer or even a network cannot handle a large request. As a penetration tester, you need to make sure that your scan should not be considered a Denial of Service attack (DoS), so timely response and request are very important considerations in scanning. Nmap has many features and parameters that can be very useful for scanning a target in a timely manner; fragmentation technique as discussed (-f) is also a useful technique for splitting your request into multiple partitions. Other important parameters are discussed below:
Delay (–scan_delay)
This is the best parameter to use to control the delay between each request. Remember to use the timing in integer format and mention the unit of time as you can control the time between each probe.
1
2
nmap -Pn -scan-delay 5s -sV 192.168.x.x
#ms (milisecond) | #s (second) | #m (minute) | #h (hour)

Host Timeout Option (–host-timeout)
Sometimes a host takes too much time to respond and if you are scanning an entire network then it is very difficult to wait for a single host. There might be so many reasons behind a slow response, for example the network connectivity and the firewall, so if you don’t want to waste your time then you can set a time limit.
1
nmap --host-timeout 10m 192.168.x.x
Idle Zombie Scan
This technique allows you to use another host on the network that is idle in order to perform a port scan to another host.The main advantage of this method is that it very stealthy because the firewall log files will record the IP address of the Zombie and not our IP.However in order to have proper results we must found hosts that are idle on the network.
Metasploit framework has a scanner that can help us to discover hosts that are idle on the network and it can be used while implementing this type of scan.
1
msf> use auxiliary/scanner/ip/ipidseq
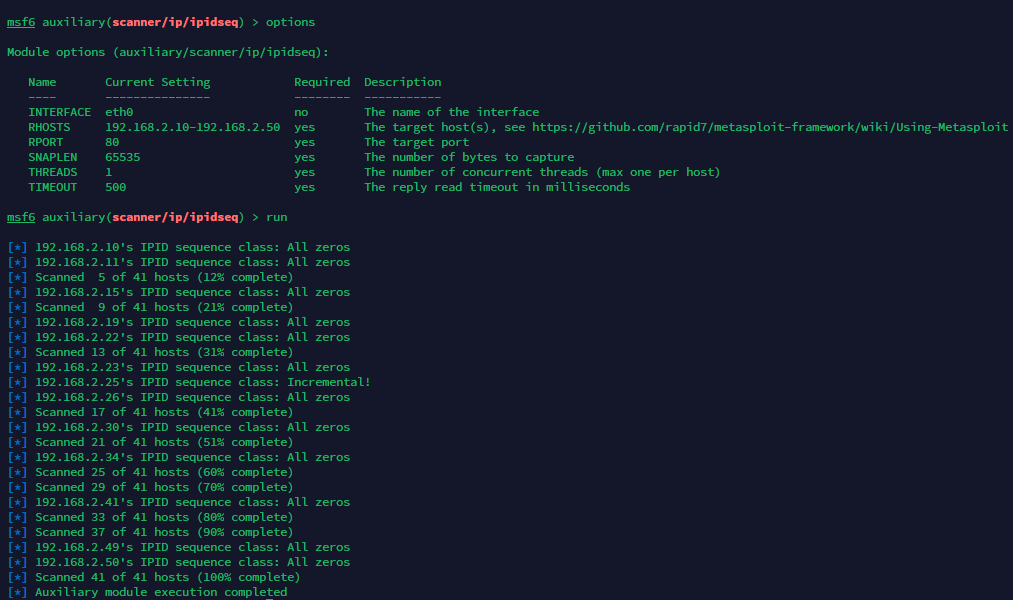
As we can see from the image above, the scanner has discovered that the IP address 192.168.2.25 is idle on the network and are potential candidates for Idle Zombie Scan. To implement an Idle Zombie scan, what we need is to use the command:
1
nmap -sI 192.168.2.25 192.168.x.x #192.168.2.25 = idle on the network and candidates for Idle Zombie Scan
Changing Data length
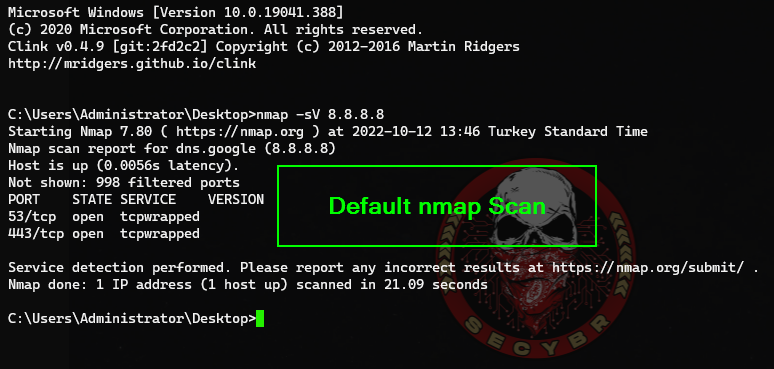
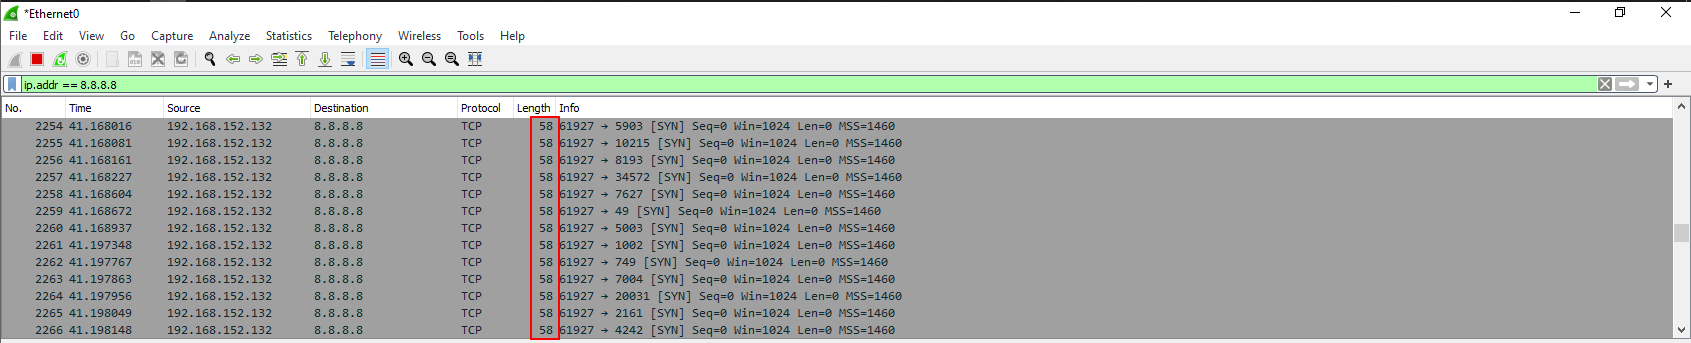
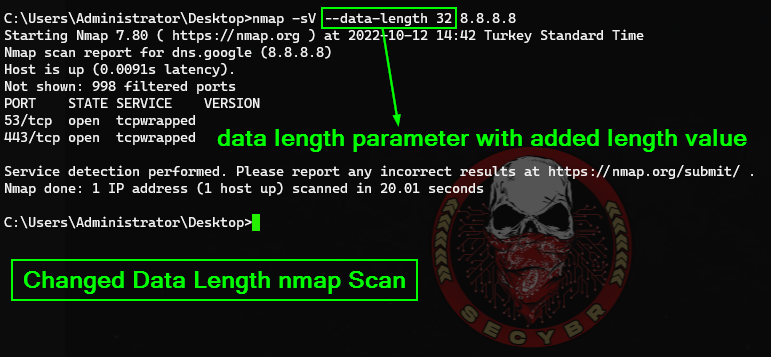
Many firewalls are inspecting packets by looking at their size in order to identify a potential port scan. This is because many scanners are sending packets that have specific size. In order to avoid that kind of detection you can use the command --data-length to add additional data and to send packets with different size than the default. In the image below we have changed the packet size by adding 25 more bytes.

Random Scan
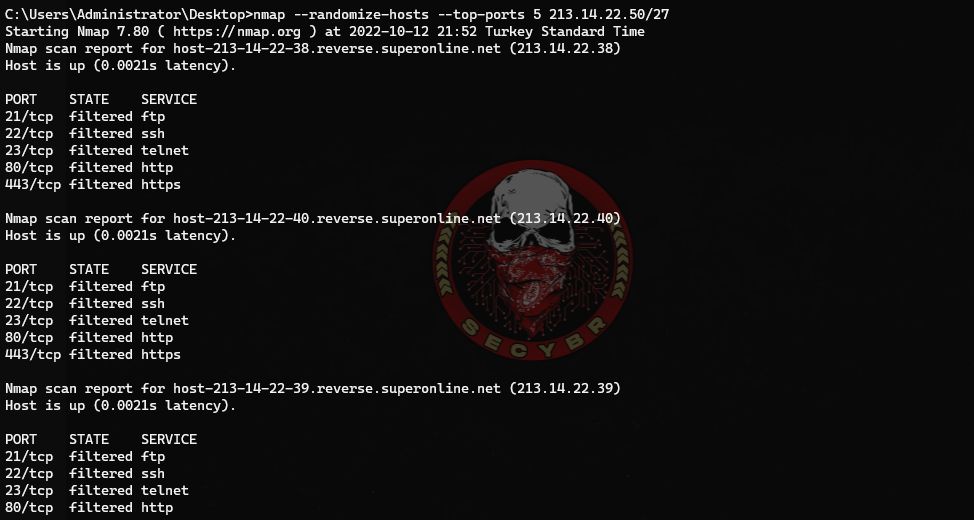
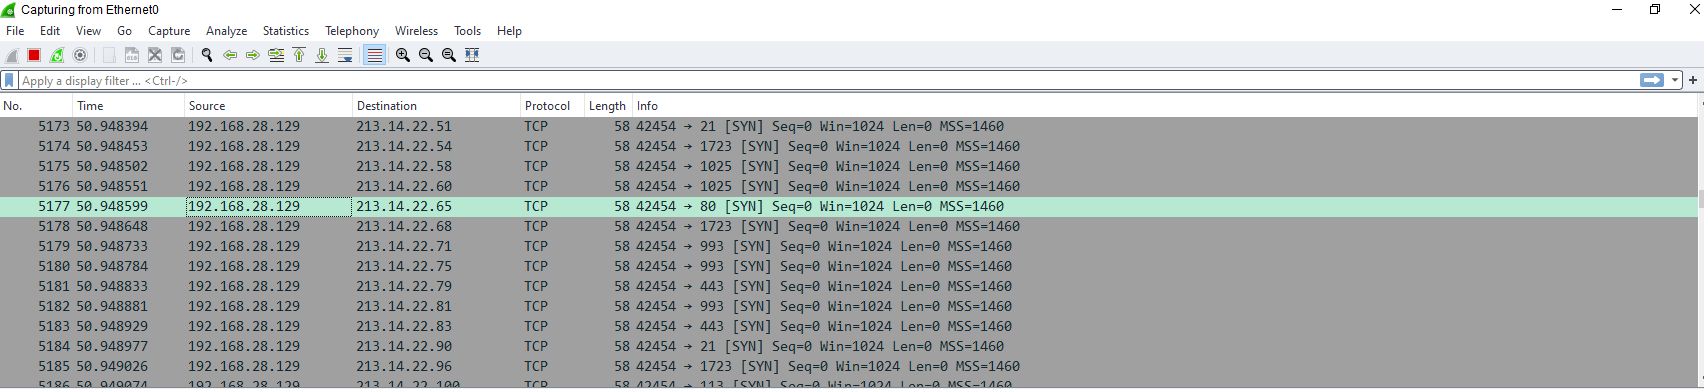
Shuffles each group of 16384 hosts before scanning. Combined with the slow timing options in Nmap, this technique can be very effective when you don’t want to alert the firewall.
This scan is quite slow when scanning large IP ranges.
1
sudo nmap -sV -p- --open -Pn -n --randomize-hosts -T4 192.168.x.x/24
Using Multiple Techniques
https://pentestlab.blog/2012/04/02/nmap-techniques-for-avoiding-firewalls/
Firewall Evasion Techniques using Nmap (https://infosecwriteups.com/firewall-evasion-techniques-using-nmap-523dd18b1b1c)
Comments powered by Disqus.